2018-01月
上月 下月
2018-01月上月 下月 2018-01-06一、mockcpp-2.6.tar.gz 的安装,以及问题解决二、shttpd 研究1、拿来主义,选择自己的端口号2、研究 example.c 里面的内容4、基于这个方法实现登录界面的想法2018-01-13一、继续 shttpd 的研究二、git commit 默认模板设置1、git commit 时,处于 vim 编辑界面时, ctrl + z可以让 vim 中断退出,从而放弃本次提交。普通的 vim 编辑时,也可以用 ctrl + z 快速退出2、设置 git commit默认模板2018-01-14[16:05]发现一个人家写好的工程dos2unix[22:12]发现有好多的 linux 发行版本[22:13] 安装 CentOS7 网络版CentOS-7-x86_64-NetInstall-1708.iso2018-01-16[6:02]一大清早,弄好个 cppunitlite,及时上传github2018-01-17[21:13]终于将 cppunitlite弄好,达到我心中的目标[21:41] linux 下 ./bash_profile的一些配置[21:50]自己整理一条命令工具,用于将C代码的 tab转化成四个空格[21:53]查看 git每次的入库详情[21:57]Makefile 覆盖默认值[22:35]本该研究一下 linux下的串口通信。无奈时间太晚,只得准备睡觉2018-01-19[4:45]_libmodbus-0.0.1.tar.gz 来自http://pes.free.fr,调试成功[6:11]尝试了一下libmodbus-3.0.6.tar.gz,效果更好,功能更强大。但是也更复杂2018-01-19[20:18]在公司尝试使用 libmodbus-0.0.1,结果失败,异常退出,由于使用 -fpic 编译的 so 文件,不知如何跟代码,被迫中止[20:21]注册一个新的 svn 代码托管平台[21:34] 试用成功[21:36] linux 自带抓包工具 tcpdump研究2018-01-20[7:20]一大早把 win7 网页版本串口调试工具弄好[9:01] win7 开启 administrator 的方法,以管理员权限运行[10:30] svn 安装2017-08笔记整理2017-08-07lcov 的使用方法2017-08-08linux下如何远程 win7 桌面linux 下切换目录(递归)的所有者linux 下用户 astyle 对代码进行格式化。删除中间文件研究 linux 下 vim 如何达到 source insight 一样的效果2017-08-09一条简单的 linux find 命令2018-01-23[5:12]MinGW图形界面编译工具,编译时报错[5:15] Makefile风格再学习[6:14] 项目编译中遇到奇怪问题,gdb 无法跟踪代码,问题解决2018-01-24[5:56] svn-server 安装配置,及使用方法2018-01-27[8:03]准备将日记改为以主题目的方式记录[11:03]得到数据分析工具KST2018-01-30[5:48]将串口抓包工具整理完毕[5:49]将之前做的secureCRT抓包工具做个整理上月 下月
2018-01-06
一、mockcpp-2.6.tar.gz 的安装,以及问题解决
x在没有启用 c++11新特性的编译器上,很顺利tar -xf mockcpp-2.6.tar.gzcmake .make make install在gcc-6.2.0上编译,则出现错误:./mockcpp/incude/mockcpp/mockcpp.h:59:8 错误: expected unqualified-id before 'static_assert'然后打开这个 mockcpp.h将原来的 static_assert 定义注释掉,换一种写法:#define EIGEN_STATIC_ASSERT(CONDITION,MSG)\ {Eigen::internal::static_assertion<bool(CONDITION)>::MSG;} #if 0template <bool condition>struct static_assert{ typedef int static_assert_failure[condition ? 1 : -1];};#endif
二、shttpd 研究
1、拿来主义,选择自己的端口号
xxxxxxxxxx在 config.h 中,修改自己的端口:#define LISTENING_PORTS "8888" /* Default listening ports */
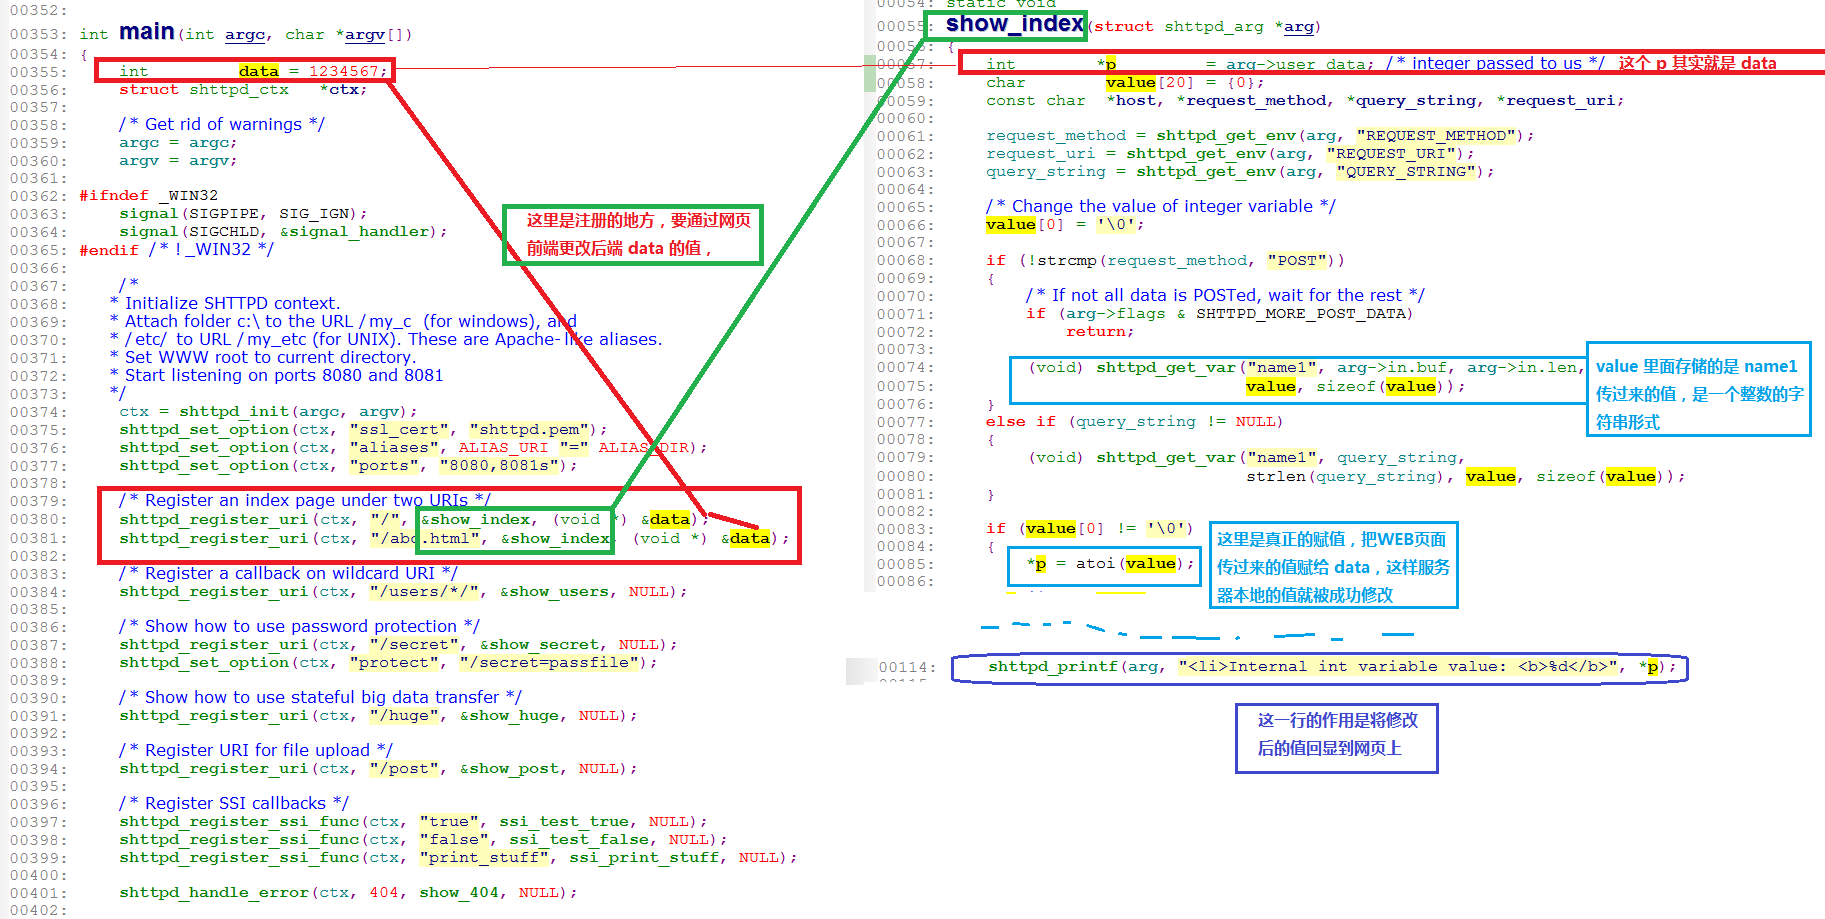
2、研究 example.c 里面的内容
xxxxxxxxxx/* Register an index page under two URIs */shttpd_register_uri(ctx, "/", &show_index, (void *) &data);shttpd_register_uri(ctx, "/abc.html", &show_index, (void *) &data);
这两行表示注册自己的处理函数,即输入
http://192.168.1.34:8888/abc.html或者http://192.168.1.34:8888都会执行 show_index 函数xxxxxxxxxxint data = 1234567;shttpd_register_uri(ctx, "/", &show_index, (void *) &data);表示
static void show_index(struct shttpd_arg *arg)的入参shttpd_arg的数据区user_data传的是一个整数。这里应该仅仅是一个说明作用,方便以后数据转化xxxxxxxxxxstruct shttpd_arg{void *priv; /* Private! Do not touch! */void *state; /* User state */void *user_data; /* Data from register_uri() */struct ubuf in; /* Input is here, POST data */struct ubuf out; /* Output goes here */unsigned int flags;#define SHTTPD_END_OF_OUTPUT 1 /* No more data do send */#define SHTTPD_CONNECTION_ERROR 2 /* Server closed the connection */#define SHTTPD_MORE_POST_DATA 4 /* arg->in has incomplete data */#define SHTTPD_POST_BUFFER_FULL 8 /* arg->in has max data */#define SHTTPD_SSI_EVAL_TRUE 16 /* SSI eval callback must set it*/#define SHTTPD_SUSPEND 32 /* User wants to suspend output */};
show_index中,接收用户数据的方法
同样道理,如果要处理的内容为字符串,则更加简单,只需要注册一个足够大的 buffer,然后就可以随便搞了
如前面传过来的字符串为
function para1,则用法为sscanf(value,"funcion %d", &my_para),成功将 para1 转化为 int 型,并保存在 my_data 里面
4、基于这个方法实现登录界面的想法
1、首先用户界面是一个登录框,登录框界面为 C 代码实现
2、用户输入密码后,如果不正确,多追回一个错误提示,继续输入
3、用户如果输入正确,可以给出一个自动跳转链接,3秒后自动登录,可在这段时间打印一个
正在登录5、多个终端,可以通过它的IP来判断登录
6、涉及到加密问题
5、可用命令行访问: curl http://192.168.1.34:8888/page1.html?name1=9907
2018-01-13
一、继续 shttpd 的研究
将诸小模块都放到 github 上面,日后方便使用,需要时随便拿一个就用
https://user:passwd@github.com/HateIron/IndependentModules.git
二、git commit 默认模板设置
1、git commit 时,处于 vim 编辑界面时, ctrl + z可以让 vim 中断退出,从而放弃本次提交。普通的 vim 编辑时,也可以用 ctrl + z 快速退出
2、设置 git commit默认模板
1)、在根目录建立模板文件 xxx_template ,内容如下:
xxxxxxxxxx[入库原因]:增加A功能[入库影响]:影响B、C功能[入库描述]:无[入 库 人]:某某某2)、设置模板
A、只能设置当前分支提交模板的命令:
xxxxxxxxxxgit config commit.template [模板文件名]配置之后,查看
.git/config,发现最后一行,就是刚刚配置的模板名称:xxxxxxxxxx[core]repositoryformatversion = 0filemode = falsebare = falselogallrefupdates = truesymlinks = falseignorecase = true[user]mail = "15900748704@139.com"name = "HateIron"[remote "origin"]url = https://user:passwd@github.com/HateIron/HateIron.gitfetch = +refs/heads/*:refs/remotes/origin/*[branch "master"]remote = originmerge = refs/heads/master[commit]template = ./HateIron_Template.txt
B、设置全局提交模板的命令
xxxxxxxxxxgit config --global commit.template [模板文件名]3)、设置文本编辑器,命令如下:
xxxxxxxxxxgit config --global core.editor [编辑器的名字]如:git config --global core.editor vi4)、提交代码
xxxxxxxxxxgit add ./git commit5)、最后将代码提交到远程分支
xxxxxxxxxxgit push
2018-01-14
[16:05]发现一个人家写好的工程dos2unix
1、它支持多种操作系统,支持
dos2unix/unix2dos,在 CentOS7上成功编译安装。
2、然后在 debian 8 上编译,问题不断
A、编译失败
xxxxxxxxxxroot@debian:/home/debian/study/dos2unix-6.0.1# makemsgfmt -c po/de.po -o po/de.momake: msgfmt: Command not foundMakefile:326: recipe for target 'po/de.mo' failedmake: *** [po/de.mo] Error 127B、解决gettext-0.18.1.1.tar.gz的问题,它的编译同样也不顺利
报错,说找不到
msgfmt,百度之,人家说是因为缺少gettext-0.18.1.1.tar.gz,于是下载一份,14M之多,configure成功,但是 make 失败:
xxxxxxxxxxIn file included from closeout.c:22:0:./stdio.h:456:1: error: 'gets' undeclared here (not in a function)_GL_WARN_ON_USE (gets, "gets is a security hole - use fgets instead");^Makefile:1106: recipe for target 'closeout.o' failedmake[5]: *** [closeout.o] Error 1然后找到 stdio.h,并将相应行注释掉
xxxxxxxxxxroot@debian:/home/debian/study/gettext-0.18.1.1# find ./ -name stdio.h./gettext-runtime/gnulib-lib/stdio.h./gettext-tools/libgettextpo/stdio.h./gettext-tools/gnulib-lib/stdio.h将报错的456行注释掉,并注释掉有同样问题的490行:
xxxxxxxxxxroot@debian:/home/debian/study/gettext-0.18.1.1# vi ./gettext-tools/gnulib-lib/stdio.h +456452 /* It is very rare that the developer ever has full control of stdin, ||| _GL_STDIO_MACROEXPAND_A453 so any use of gets warrants an unconditional warning. Assume it is ||| dprintf454 always declared, since it is required by C89. */ ||| fclose455 #undef gets ||| fflush456 //_GL_WARN_ON_USE (gets, "gets is a security hole - use fgets instead"); ||| gets457..............488 _GL_CXXALIAS_RPL (fprintf, int, (FILE *fp, const char *format, ...)); ||| _GL_FTELL_WARN489 # else ||| ftell490 //_GL_CXXALIAS_SYS (fprintf, int, (FILE *fp, const char *format, ...)); ||| ftello491 # endif编译一段时间,就会再次报同样的问题,因为生成了新的 stdio.h 文件
改完三个文件,终于编译完成,然后
make install顺利完成、C、解决掉
gettext之后,继续前进,还是报错:xxxxxxxxxxroot@debian:/home/debian/study/dos2unix-6.0.1# makemsgfmt -c po/de.po -o po/de.momsgfmt: error while loading shared libraries: libgettextsrc-0.18.1.so: cannot open shared object file: No such file or directoryMakefile:326: recipe for target 'po/de.mo' failedmake: *** [po/de.mo] Error 127查找 .so 文件,是存在的root@debian:/home/debian/study/dos2unix-6.0.1# find / -name ibgettextsrc-0.18.1.soroot@debian:/home/debian/study/dos2unix-6.0.1# find / -name libgettextsrc-0.18.1.so/home/debian/study/gettext-0.18.1.1/gettext-tools/src/.libs/libgettextsrc-0.18.1.so/usr/local/lib/libgettextsrc-0.18.1.soroot@debian:/home/debian/study/dos2unix-6.0.1#百度之,说执行命令
ldconfig就行,于是试了一下xxxxxxxxxxroot@debian:/home/debian/study/dos2unix-6.0.1# ldconfig/sbin/ldconfig.real: /usr/local/lib/libstdc++.so.6.0.22-gdb.py is not an ELF file - it has the wrong magic bytes at the start.root@debian:/home/debian/study/dos2unix-6.0.1#然后再次
make就成功了,然后make install,圆满完成:xxxxxxxxxxroot@debian:/home/debian/study/dos2unix-6.0.1# whereis dos2unixdos2unix: /usr/bin/dos2unix /usr/share/man/man1/dos2unix.1root@debian:/home/debian/study/dos2unix-6.0.1#3、在 Cygwin 上安装
dos2unix,很浪费时间A、首先,它说找不到
-liconv于是下载了一份
iconv,然后编译之,很顺利
configure ; make ; make installB、然后回到
dos2unix,继续编译,还说找不到-liconvxxxxxxxxxx$ makegcc dos2unix.o querycp.o common.o -lintl -liconv -Wl,--enable-auto-import -o dos2unix.exe/usr/lib/gcc/x86_64-pc-cygwin/5.4.0/../../../../x86_64-pc-cygwin/bin/ld: cannot find -liconvcollect2: 错误:ld 返回 1make: *** [Makefile:290:dos2unix.exe] 错误 1于是索性把 Makefile 中,相关的
-liconv都删除掉xxxxxxxxxxifeq (cygwin,$(OS))ifdef ENABLE_NLS#LDFLAGS_EXTRA = -lintl -liconv -Wl,--enable-auto-importLDFLAGS_EXTRA = -lintl -Wl,--enable-auto-importendif然后编译,终于不说
liconv的事了C、报错说 Cygwin 下没有找到
msgfmt命令xxxxxxxxxx$ makegcc dos2unix.o querycp.o common.o -lintl -Wl,--enable-auto-import -o dos2unix.exeln -f dos2unix.exe mac2unix.exemsgfmt -c po/nl.po -o po/nl.momake:msgfmt:命令未找到make: *** [Makefile:328:po/nl.mo] 错误 127百度之,说是要安装
gettext,于是在 cygwin 下进入gettext-0.18.1.1目录,光./configure命令,至少执行了40分钟,然后一运行make,就报错了xxxxxxxxxx.libs/relocatable.o: In function `DllMain':/cygdrive/c/Users/Administrator/Downloads/gettext-0.18.1.1/gettext-runtime/intl/./relocatable.c:324: undefined reference to `cygwin_conv_to_posix_path'/cygdrive/c/Users/Administrator/Downloads/gettext-0.18.1.1/gettext-runtime/intl/./relocatable.c:324:(.text+0x133): relocation truncated to fit: R_X86_64_PC32 against undefined symbol `cygwin_conv_to_posix_path'collect2: error: ld returned 1 exit statusmake[3]: *** [Makefile:221:libintl.la] 错误 1make[3]: 离开目录“/cygdrive/c/Users/Administrator/Downloads/gettext-0.18.1.1/gettext-runtime/intl”make[2]: *** [Makefile:1054:all-recursive] 错误 1make[2]: 离开目录“/cygdrive/c/Users/Administrator/Downloads/gettext-0.18.1.1/gettext-runtime”make[1]: *** [Makefile:957:all] 错误 2make[1]: 离开目录“/cygdrive/c/Users/Administrator/Downloads/gettext-0.18.1.1/gettext-runtime”make: *** [Makefile:277:all-recursive] 错误 1D、最张放弃 Cygwin 下的安装
[22:12]发现有好多的 linux 发行版本
获取任意 linux 操作系统安装镜像:
xxxxxxxxxxhttp://mirrors.ustc.edu.cn
顺手下载了 Debian9、CentOS7网络版、Deepin、linuxmint等等
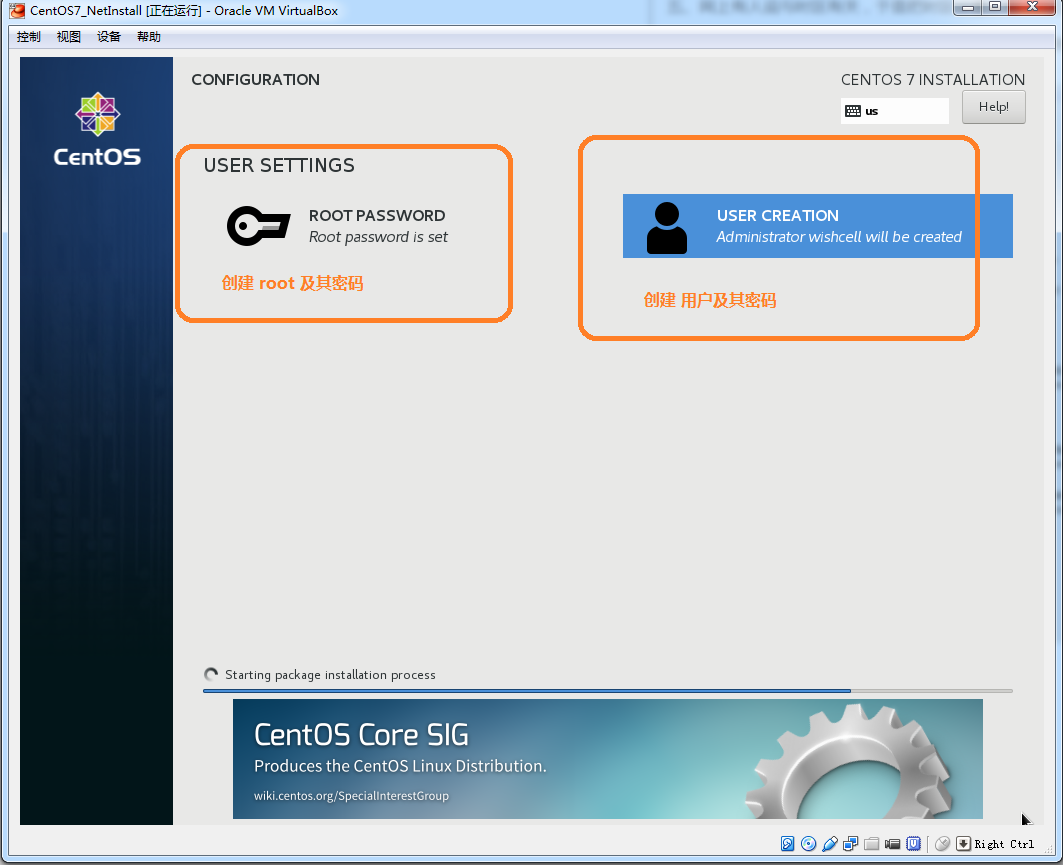
[22:13] 安装 CentOS7 网络版CentOS-7-x86_64-NetInstall-1708.iso
一、选择安装源
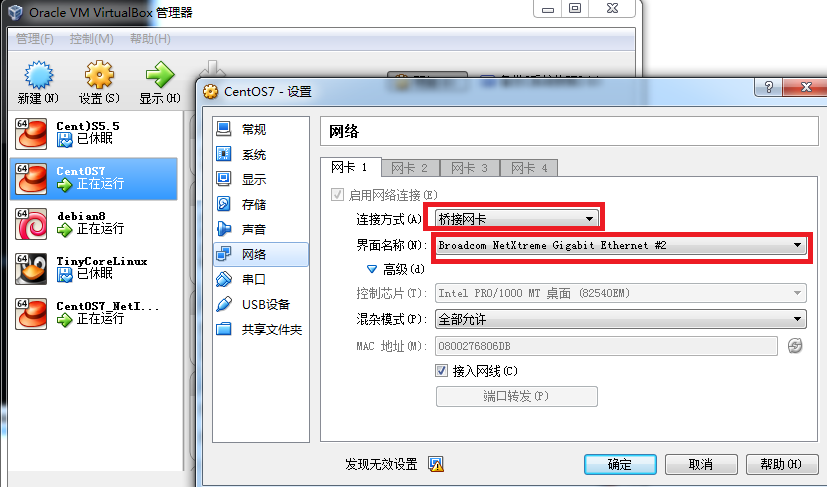
二、首先要配置好网络
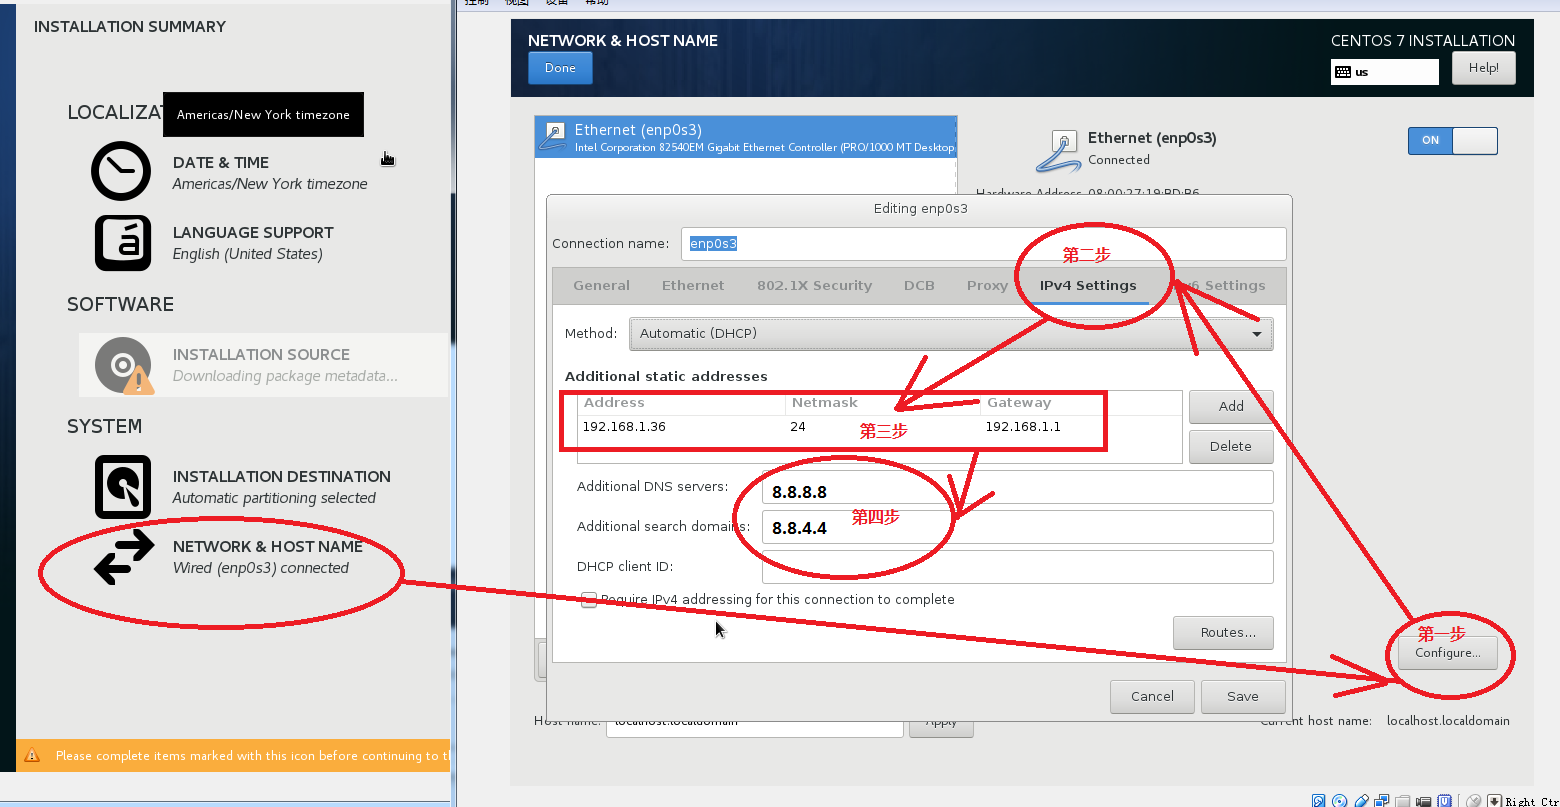
三、配置好新安装环境的 IP
四、已经全部填写完毕。但是最下方仍然提示,有两项没有填写完毕。
经验证,
http://mirror.centos.org/centos/7/os/x86_64/这个网址是有效的。 据自己猜测,应该是网络连不通外网,虽然局域网能拼通新加的 192.168.1.36.
但是它不一定能上得了外网。于是只能就此打住。
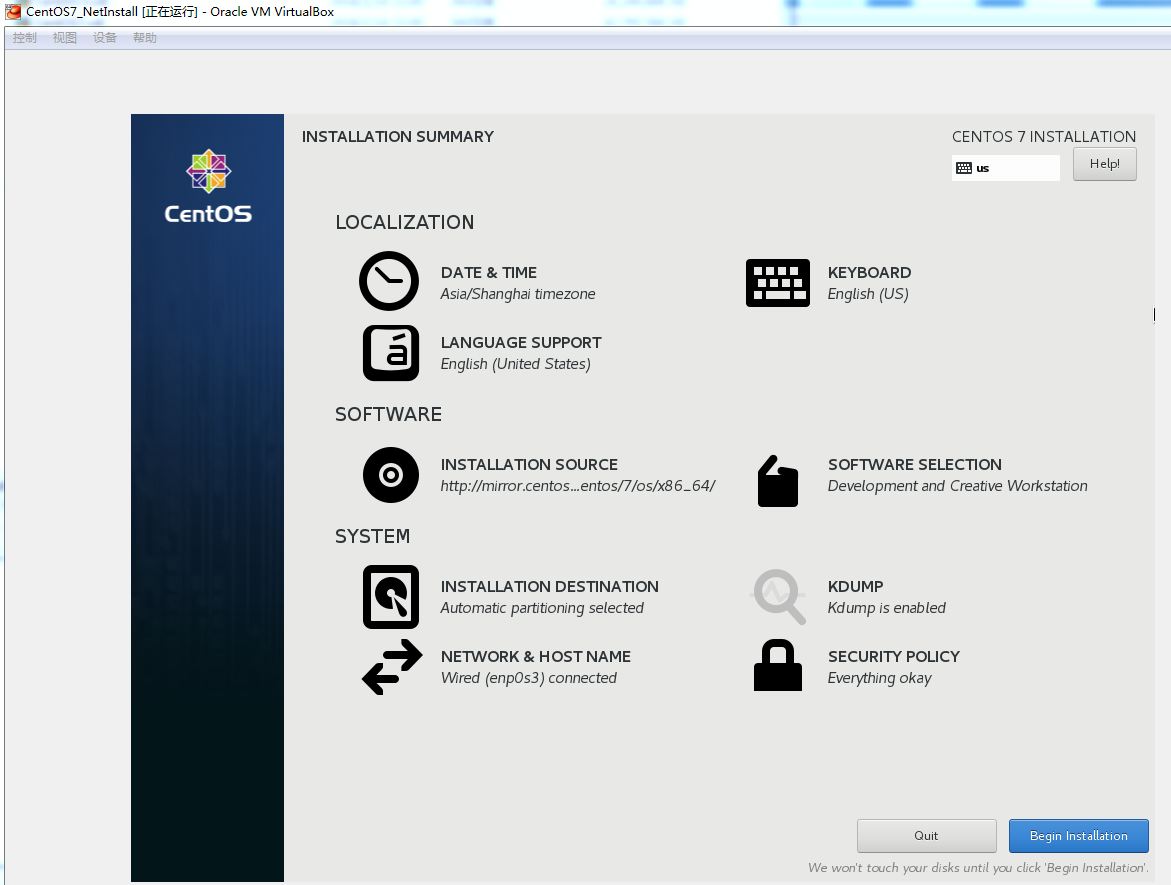
五、网上有人说与时区有关,于是把时区设置正确,然后再把 SECURITY POLICY 随便选上几项,
然后竟然都可选了,于是选择了一个最复杂的开发服务器类型,安装包极多,极大
六、进入正常安装流程
七、至此,已经和光盘安装完全一致。可以安心睡觉去了[22:50]

2018-01-16
[6:02]一大清早,弄好个 cppunitlite,及时上传github
2018-01-17
[21:13]终于将 cppunitlite弄好,达到我心中的目标
漂亮的 Makefile 如下:
xxxxxxxxxxCXX = gccLD = g++CXXFLAGS = -g#CXXFLAGS= -g -DMyMacroLDFLAGS = -oOBJ_DIR = ./libsModuleDir= ./DebugINCS =-I./includeLIBS = #LIBS = -lwinsock32vpath %.c ./sourcevpath %.cpp ./sourcevpath %.cpp ./exampleEXE_NAME = ut###################################################SRC = $(notdir $(wildcard ./source/*.c))SRCC = $(notdir $(wildcard ./source/*.cpp))ExampleSRCC = #ExampleSRCC = $(notdir $(wildcard ./example/*.cpp))OBJS = $(SRC:%.c=$(ModuleDir)/%.o) $(SRCC:%.cpp=$(ModuleDir)/%.o)#ExampleSRCCObj=ExampleSRCCObj=$(ExampleSRCC:%.cpp=$(ModuleDir)/%.o)#OBJS= $(patsubst %.c,$(ModuleDir)/%.o, $(SRC)) \# $(patsubst %.cpp,$(ModuleDir)/%.o, $(SRCC))${EXE_NAME} : ${OBJS} ${ExampleSRCCObj} ar rcso ${OBJ_DIR}/frame.a ${OBJS} ifeq ($(ExampleSRCC),)else ${LD} ${CXXFLAGS} ${INCS} ${OBJS} ${ExampleSRCCObj} -o $@ clear echo now is testing.... ./ut.exe endif rm ${ModuleDir} -rf# compile windows dll#${LD} ${CXXFLAGS} ${LDFLAGS} ${ModuleDir}/frame.dll ${OBJS} -W1, --output-def,${ModuleDir}/frame.def,--output-implib,${ModuleDir}/frame.a#${LD} ${CXXFLAGS} ${LDFLAGS} frame.dll ${OBJS} -w1, --output-def, frame.def,--output-implib,frame.a#gcc -g shared -o foo.dll foo.c print.c -w1,--output-def, print.def,--output-implib, foo.a#${LD} ${LDFLAGS} $@ ${OBJS} ${LIBS}depend_dir : mkdir -p ${ModuleDir} mkdir -p ${OBJ_DIR}$(ModuleDir)/%.o : %.cpp | depend_dir ${LD} -c ${CXXFLAGS} ${INCS} $< -o $@$(ModuleDir)/%.o : %.c | depend_dir ${CXX} ${CXXFLAGS} ${INCS} $< -o $@ .PHONY : cleanclean: @rm log result -rf @rm {EXE_NAME} -rf @rm ${ModuleDir} -rfcheck: @./${EXE_NAME}用户使用说明书:
xxxxxxxxxx用法:1、make 生成测试框架 frame.a,不带 main 函数.这种场景下,要使用外部的 main 函数2、make main=1 会同时生成带 main 函数的 frame.a 和 ut.exe而且同时会运行 ./ut.exe,效果很拉风3、CHECK_AND_SAVE 宏要依赖外部模块,外部模块自己实现AddFailStr(#CaseName)和AddSuccStr(#CaseName) 函数,这应该不是一件难事,而是一件很有意思的事情。如果没有外部实现也没有关系,只要不用这两个宏就可以了。
编译全部独立模块的脚本
xxxxxxxxxxcurrDir = $(shell pwd)IndependentModuleDir = ${currDir}SUBDIRS = ${IndependentModuleDir}/cppUnitLite \${IndependentModuleDir}/shttpd/srcall:@list='$(SUBDIRS)'; \for subdir in $$list; do \echo "clean before make in $$subdir";\(cd $$subdir && make clean); \done; \for subdir in $$list; do \echo "now is Making $$subdir"; \(cd $$subdir && make) \done;.PHONY : cleanclean:@list='$(SUBDIRS)'; \for subdir in $$list; do \echo "cleaning $$subdir"; \(cd $$subdir && make clean); \done;
[21:41] linux 下 ./bash_profile的一些配置
xxxxxxxxxxPATH=$PATH:$HOME/.local/bin:$HOME/binexport SVN_EDITOR=vimexport GIT_EDITOR=vimexport PATHexport PS1="[\[\e[36m\]\u][\e]]....... 漂亮的风格设置
svn add命令,递归增加目录下所有文件xxxxxxxxxxsvn add ./ --no-ignore --force但是仍然报错,原因是这里的部分子目录里面也有
.svn目录,冲突了。所以必须先将原来的.svn先删除干净,然后再添加xxxxxxxxxxfind ./ -name '.svn' | xargs rm -rfsvn add ./ --no-ignore --force
[21:50]自己整理一条命令工具,用于将C代码的 tab转化成四个空格
xxxxxxxxxx# cd /usr/bin# touch tab2space# vim tab2spacesed -i -e 's/\t/ /g' `find ./ -name '*.[c|h]'`
[21:53]查看 git每次的入库详情
xxxxxxxxxx1、git log --name-status #每次修改的文件列表,显示状态2、git log --name-only #每次修改的文件列表3、git log --stat #每次修改的文件列表,及文件修改的统计4、git whatchanged --stat #每次修改的文件列表,及文件修改的统计5、git show #显示最后一次的文件改变的具体内容
[21:57]Makefile 覆盖默认值
xxxxxxxxxx$ cat Makefile.PHONY:allAGE=12all: @echo "age=${AGE}"这个 Makefile 中,AGE默认值为 12,执行 make 输出
age=44,但是执行make AGE=35则输出 age=35xxxxxxxxxx$ make AGE=44age=44
[22:35]本该研究一下 linux下的串口通信。无奈时间太晚,只得准备睡觉
有心人列出的学习资料,抄之;
2018-01-19
[4:45]_libmodbus-0.0.1.tar.gz 来自http://pes.free.fr,调试成功
具体的安装过程还挺复杂:
1、解压代码包,将其中的
libmodbus.so/master-exemple/slave-exemple先删除,但是却发现master-exemple/slave-exemple根本删除不掉。暂且不管2、解决编译报错
xxxxxxxxxx[root@localhost libmodbus-0.0.1]# makegcc -Wall -O3 -c commun.c -I.commun.c: In function ‘Mb_open_device’:commun.c:124:23: warning: argument to ‘sizeof’ in ‘bzero’ call is the same expression as the destination; did you mean to remove the addressof? [-Wsizeof-pointer-memaccess]bzero(&Mb_tio,sizeof(&Mb_tio));^gcc -Wall -O3 -c mbs.c -I.mbs.c: In function ‘Mbs’:mbs.c:329:9: error: label at end of compound statementdefault:^~~~~~~make: *** [mbs.o] Error 1[root@localhost libmodbus-0.0.1]#很快解决这是代码级错误,在
mbs.c:329后面加上一句break;xxxxxxxxxx326 if(Mb_ptr_end_slve!=NULL)327 (*Mb_ptr_end_slve)(fonction,adresse,longueur);328 break;329 default:break;330 }再次编译,仍然报错
xxxxxxxxxx[root@localhost libmodbus-0.0.1]# makegcc -Wall -O3 -c mbs.c -I.gcc -Wall -O3 -c mbm.c -I.gcc -Wall -O3 -o libmodbus.so commun.o mbs.o mbm.o -lpthread -shared -I./usr/bin/ld: commun.o: relocation R_X86_64_32 against `.rodata.str1.1' can not be used when making a shared object; recompile with -fPICcommun.o: error adding symbols: Bad valuecollect2: error: ld returned 1 exit statusmake: *** [libmodbus] Error 1[root@localhost libmodbus-0.0.1]#要求增加
-fpic编译选项,以生成位置无关代码,那是真正的共享库,但是实际操作中,发现添加-fpic或-fPIC都是可以的,具体细节已经忘记,需要再看《程序员的自我修养》xxxxxxxxxx[root@localhost libmodbus-0.0.1]# vim MakefileCC = gcc#CFLAGS = -Wall -O3CFLAGS = -Wall -O3 -fPIC #或者 CFLAGS = -Wall -O3 -fpic然后继续编译
xxxxxxxxxx[root@localhost libmodbus-0.0.1]# make cleanrm -f ~* *~ *.ASV *.bak *.o core> /dev/null[root@localhost libmodbus-0.0.1]# makegcc -Wall -O3 -fpic -c commun.c -I.commun.c: In function ‘Mb_open_device’:commun.c:124:23: warning: argument to ‘sizeof’ in ‘bzero’ call is the same expression as the destination; did you mean to remove the addressof? [-Wsizeof-pointer-memaccess]bzero(&Mb_tio,sizeof(&Mb_tio));^gcc -Wall -O3 -fpic -c mbs.c -I.gcc -Wall -O3 -fpic -c mbm.c -I.gcc -Wall -O3 -fpic -o libmodbus.so commun.o mbs.o mbm.o -lpthread -shared -I.[root@localhost libmodbus-0.0.1]# lsAUTHORS commun.o libmodbus.html Makefile master-exemple mbm.o mbs.o README slave-exemplecommun.c COPYING libmodbus.so master-example.c mbm.c mbs.c modbus.h slave-example.c[root@localhost libmodbus-0.0.1]#发现编译成功
3、安装程序
xxxxxxxxxx[root@localhost libmodbus-0.0.1]# lsAUTHORS commun.o libmodbus.html Makefile master-exemple mbm.o mbs.o README slave-exemplecommun.c COPYING libmodbus.so master-example.c mbm.c mbs.c modbus.h slave-example.c可以看到已经生成共享库
libmodbus.so,然后安装xxxxxxxxxx[root@localhost libmodbus-0.0.1]# make installchown root.root libmodbus.socp libmodbus.so /usr/lib/cp modbus.h /usr/includemkdir /usr/doc/libmodbusmkdir: cannot create directory ‘/usr/doc/libmodbus’: No such file or directorymake: *** [install] Error 1说无法生成
/usr/doc/libmodbus,于是查看Makefile并修改之,需要先建立/usr/doc/xxxxxxxxxxinstall:chown root.root libmodbus.socp libmodbus.so /usr/lib/cp modbus.h /usr/includemkdir -p /usr/doc #增加一句mkdir -p /usr/doc/libmodbus #修改一下,增加 -p 参数cp README /usr/doc/libmodbuscp AUTHORS /usr/doc/libmodbuscp COPYING /usr/doc/libmodbus再次安装,终于成功
xxxxxxxxxx[root@localhost libmodbus-0.0.1]# make installchown root.root libmodbus.socp libmodbus.so /usr/lib/cp modbus.h /usr/includemkdir -p /usr/docmkdir /usr/doc/libmodbuscp README /usr/doc/libmodbuscp AUTHORS /usr/doc/libmodbuscp COPYING /usr/doc/libmodbus4、弯路
libmodbus库编译安装成功之后,由于看到目录下有之前未删除成功的master-exemple/slave-exemple两个可执行程序,遂将它们当作自己编译出来的可执行文件,运行之xxxxxxxxxx[root@localhost libmodbus-0.0.1]# ./master-exemple./master-exemple: error while loading shared libraries: libmodbus.so: wrong ELF class: ELFCLASS64[root@localhost libmodbus-0.0.1]# ./slave-exemple./slave-exemple: error while loading shared libraries: libmodbus.so: wrong ELF class: ELFCLASS64[root@localhost libmodbus-0.0.1]#两个都报错:
wrong ELF class: ELFCLASS64,百度有人这样说:是因为64位机器安装了32位的程序,需要安装一些32位机相关的动态链接库,人家提示安装glibc.i686xxxxxxxxxxyum install glibc.i686 #幸亏自己有 CentOS-Everything.iso很快安装好,再次执行
xxxxxxxxxx[root@localhost libmodbus-0.0.1]# ./master-exemple./master-exemple: error while loading shared libraries: libmodbus.so: wrong ELF class: ELFCLASS64问题依旧。于是认真查看 Makefile 中与平台相关的代码,却没有找到,再查看C代码中相关配置,也没有。
于是意识到
master-exemple/slave-exemple都是以前人家编译好的,我不能使用。5、成功编译/运行测试用例
打开
master-example.c,前两行就提示如何编译xxxxxxxxxx/* compiling : gcc master-example.c -o master-example -lmodbus */于是编译之
xxxxxxxxxx[root@localhost libmodbus-0.0.1]# gcc master-example.c -o master-example -lmodbus[root@localhost libmodbus-0.0.1]# ./master-example./master-example2: error while loading shared libraries: libmodbus.so: cannot open shared object file: No such file or directory运行报错,说找不到动态链接库,更新一下动态链接库:
[root@localhost libmodbus-0.0.1]# ldconfig再次执行,终于成功,因为虚拟机,无法操作实际串口,总之,程序跑了起来
[root@localhost libmodbus-0.0.1]# ./master-example
Can't get terminal parameters : Input/output error
send packet length 25
send packet[0] = 1
send packet[1] = 10
send packet[2] = b0
send packet[3] = 0
send packet[4] = 0
send packet[5] = 8
send packet[6] = 10
send packet[7] = 0
send packet[8] = 1
send packet[9] = 0
send packet[10] = 2
send packet[11] = 0
send packet[12] = 3
send packet[13] = 0
send packet[14] = 4
send packet[15] = 0
send packet[16] = 5
send packet[17] = 0
send packet[18] = 5
send packet[19] = 0
send packet[20] = 5
send packet[21] = 0
send packet[22] = 5
send packet[23] = 1
send packet[24] = 32
sleeping 1000 ms
start writing
write ok
starting receiving data, total length : 8
receiving byte :0x0 0 (0)
receiving byte :0x0 0 (0)
receiving byte :0x0 0 (0)
最后,
./slave-example也是同样操作[root@localhost libmodbus-0.0.1]# gcc slave-example.c -o slave-example -lmodbus [root@localhost libmodbus-0.0.1]# ./slave-example Can't get terminal parameters : Input/output error调试好的代码被放在 git 库中:
https://github.com/HateIron/IndependentModules.git
[6:11]尝试了一下libmodbus-3.0.6.tar.gz,效果更好,功能更强大。但是也更复杂
2018-01-19
[20:18]在公司尝试使用 libmodbus-0.0.1,结果失败,异常退出,由于使用 -fpic 编译的 so 文件,不知如何跟代码,被迫中止
[20:21]注册一个新的 svn 代码托管平台
http://www.52svn.com/index.php/Home/User/index.html
免费用户有20M空间,应该不够。1.5G空间2年才 192 元,不贵。先试用一下,后面有必要得买个服务
首个项目地址:svn://www.52svn.com/HateIron.modules,可以把学习到的小模块都放在这里,以后随时取用
虽然svn每个目录下都有.svn比较讨厌,但是它不用每次都拖家带口把所有项目拉下来。
[21:34] 试用成功
只是 svn commit 时,默认的入库模板不知如何配置
通过export SVN_EDITOR=vim命令,配置默认的入库编辑器为 vim.
[21:36] linux 自带抓包工具 tcpdump研究
这个网站的内容全盘吸收,感谢!
http://www.itshouce.com.cn/linux/linux-tcpdump.html
这个网站的也全要:
https://www.cnblogs.com/ggjucheng/archive/2012/01/14/2322659.html
将它们都合并到一起放在我的 wiki 上,每日工作日记上:
2018-01-20
[7:20]一大早把 win7 网页版本串口调试工具弄好
先上效果图
具体安装过程
1、找到 win7 下的
MSComm32.OCX注册教程以及工具文件包 首先将系统必要的控件注册到 win7,采用注册工具。 regsvr32 有问题
打开
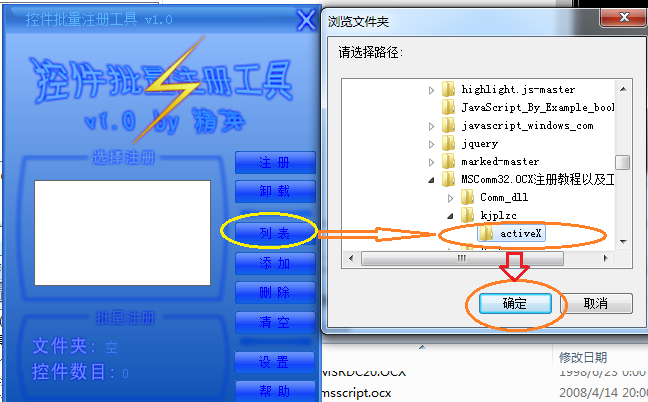
MSComm32.OCX注册教程以及工具文件\kjplzc\activeX\控件批量注册工具v1.0.exe,然后
先注册
MSComm32.OCX注册教程以及工具文件\kjplzc\activeX目录,然后注册MSComm32.OCX注册教程以及工具文件\Comm_dll\mscomm32.ocx\mscomm32.ocx目录。2、注册完毕后
创建一个操作串口的 web 页面 javascript_comm.html
代码如下:
xxxxxxxxxx<html><head><title>JavaScript串口调试工具</title><meta http-equiv="Content-Type" content="text/html; charset=utf-8" /><SCRIPT ID=clientEventHandlersJS LANGUAGE=javascript><!--function MSComm1_OnComm(){switch(MSComm1.CommEvent){case 1:{ window.alert("Send OK_); break;} //发送事件case 2: { Receive();break;} //接收事件default: alert("Event Raised!"+MSComm1.CommEvent);;}}//--></SCRIPT><SCRIPT LANGUAGE=javascript FOR=MSComm1 EVENT=OnComm><!--// MSComm1控件每遇到OnComm 事件就调用 MSComm1_OnComm()函数MSComm1_OnComm();//--></SCRIPT><script language="JavaScript" type="text/JavaScript"><!--String.prototype.Blength = function(){var arr = this.match(/[^\x00-\xff]/ig);return arr == null ? this.length : this.length + arr.length;}function OperatePort(){if(MSComm1.PortOpen==true){try{MSComm1.PortOpen=false;document.getElementById("OperateButton").value="打开串口";}catch(ex){alert(ex.message);}}else{try{MSComm1.PortOpen=true;document.getElementById("OperateButton").value="关闭串口";}catch(ex){alert(ex.message);}}}function ConfigPort(){if(MSComm1.PortOpen==false){try{MSComm1.CommPort=document.getElementById("ComName").value;MSComm1.Settings=document.getElementById("BaudRate").value.toString()+","+document.getElementById("CheckBit").value.toString()+","+document.getElementById("DataBits").value.toString()+","+document.getElementById("StopBits").value.toString();MSComm1.OutBufferCount =0; //清空发送缓冲区MSComm1.InBufferCount = 0; //滑空接收缓冲匿alert("已配置串口COM"+MSComm1.CommPort+"\n 参数:"+MSComm1.Settings);}catch(ex){alert(ex.message);}}else{alert("请先关闭串口后再设置_);}}function Send(){//alert(document.getElementById("txtSend").value);var orgstr=document.getElementById("txtSend").value;var newstr="";var hexflag=document.getElementById("isSendHex").checked;if(hexflag&&orgstr!=""){if(orgstr.substr(0,2)=="0x"||orgstr.substr(0,2)=="0X"){orgstr=orgstr.substring(2,orgstr.length);}if(orgstr.length%2!=0){orgstr="0"+orgstr;}if((newstr=str2hex(orgstr,16))==""){alert("错误的16进制数);return false;}}try{MSComm1.Output=hexflag?newstr:orgstr;}catch(ex){alert(ex.message);}}function Receive(){document.getElementById("txtReceive").value += MSComm1.Input;}function ClearReceived(){document.getElementById("txtReceive").innerText="";}--></script></head><body><form name="form1"><fieldset style="width:200px;height:250px;text-align:center;"><legend>配置串口</legend><div style="float:left;width:200px"><br/><span>串口号</span><select name="ComName" id="ComName" style="width:75px" ><option value="1" >COM1</option><option value="2" >COM2</option><option value="3" selected >COM3</option><option value="4" >COM4</option></select><br/><span>波特率</span><select name="BaudRate" id="BaudRate" style="width:75px" ><option value="9600" selected >9600</option><option value="57600" >57600</option><option value="115200" >115200</option></select><br/><span>校验位</span><select name="CheckBit" id="CheckBit" style="width:75px" ><option value="N" selected >无NONE</option><option value="O" >奇ODD</option><option value="E" >偶EVEN</option></select><br/><span>数据位</span><input type=text id="DataBits" name="DataBits" value=8 style="width:75px;height:20px"><br/><span>停止位</span><input type=text id="StopBits" name="StopBits" value=1 style="width:75px;height:20px"><br/><br/><input type="button" id="ConfigButton" style="width:80px;height:30px;font-size:13px" name="ConfigButton" value="配置串口" onClick="ConfigPort()"><input type="button" id="OperateButton" style="width:80px;height:30px;font-size:13px" name="OperateButton" value="打开串口" onClick="OperatePort()"></div></fieldset><fieldset style="width:200px;height:250px;text-align:center;"><legend>发送区域</legend><div style="float:left;"><textarea id="txtSend" name="txtSend" style="width:200px;height:160px"></textarea><br/><span><input id="isSendHex" name="isSendHex" type="checkbox" checked="0" />16进制</span><input type="button" id="SendButton" style="width:100px;height:30px" name="SendButton" value="发送" onClick="Send()"></div></fieldset><fieldset style="width:200px;height:250px;text-align:center;"><legend>接收区域</legend><div style="float:left;"><textarea id="txtReceive" READONLY=TRUE name="txtReceive" style="width:200px;height:160px"></textarea><br/><span><input id="isReceiveHex" name="isReceiveHex" type="checkbox" />16进制</span><input type="button" id="ClearButton" style="width:100px;height:30px" name="ClearButton" value="清空" onClick="ClearReceived()"></div></fieldset></form><OBJECT ID="MSComm1" WIDTH=100 HEIGHT=51 type="application/x-oleobject"CLASSID="CLSID:648A5600-2C6E-101B-82B6-000000000014"CODEBASE="MSCOMM32.OCX"><PARAM NAME="_ExtentX" VALUE="2646"><PARAM NAME="_ExtentY" VALUE="1323"><PARAM NAME="_Version" VALUE="393216"><PARAM NAME="DTREnable" VALUE="-1"><PARAM NAME="RThreshold" VALUE="1"><PARAM NAME="RTSEnable" VALUE="-1"></OBJECT></body></html>

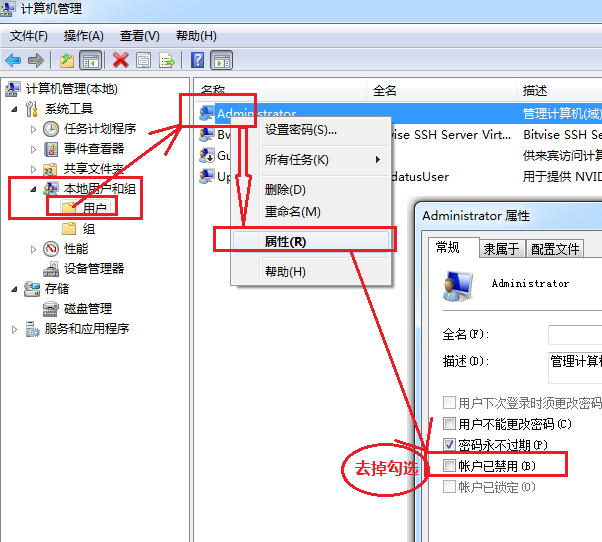
[9:01] win7 开启 administrator 的方法,以管理员权限运行
抄自 https://jingyan.baidu.com/article/64d05a0250b265de55f73b0a.html
1、右击命令行图标==》以管理员运行=》然后在命令行输入以下命令:
xxxxxxxxxxC:\Users\Administrator>net user administrator /active:yes命令成功完成。
2、计算机右击==》管理
[10:30] svn 安装
http://www.yiibai.com/html/svn/2013/0912280.html
2017-08笔记整理
2017-08-07
lcov 的使用方法
xxxxxxxxxxlcov -d dir1 -d dir2 ... -d dirN -c -o ./abc.infogenhtml -o ./dest_dir ./abc.info
2017-08-08
linux下如何远程 win7 桌面
1、采用 web-server 操作
2、在 win7 上安装 ssh 工具软件,在 linux 上可以远程到 windows ,运行正常的 bat 命令
linux 下切换目录(递归)的所有者
chown usr:usr ./dir dest_user
linux 下用户 astyle 对代码进行格式化。删除中间文件
xxxxxxxxxx# find ./ -type f | grep .orig$ | xargs rm
研究 linux 下 vim 如何达到 source insight 一样的效果
依赖包:taglist_46.zip,终于达到了预想的效果
https://github.com/HateIron/HateIron/wiki/vim
2017-08-09
一条简单的 linux find 命令
find ./ -name *.c | xargs astyle
find ./ -name *.h | xargs asytle
find ./ -name '*.[c|h]' | grep -v './dir'
find 文档https://github.com/HateIron/HateIron/wiki/find
2018-01-23
[5:12]MinGW图形界面编译工具,编译时报错
xxxxxxxxxx..\src\socket.c:12 undefined reference to 'WSAStartup@8'解决办法是,进入 project -> Settings ...->Link,然后在Extra linking iptions一栏中加上-lwsock32
[5:15] Makefile风格再学习
文档https://github.com/HateIron/HateIron/wiki/makefile
[6:14] 项目编译中遇到奇怪问题,gdb 无法跟踪代码,问题解决
xxxxxxxxxx(gdb)lLine number 2 outof range./path/code/serial.c has 1 lines(gdb)l 11 ^M#include<sys/types.h>^M$include<sys/stat.h>^M//#include<sys/time.h>^M//#include<sys/ioctrl.h>^M#include<unistd.h>^M<termios.h>^M#...查看出问题所在,在
gdb下面输入l命令时,报错Line number 2 outof range ./path/code/serial.c has 1 lines,但是输入l 1或者l 2时,有杂乱的输出。显然是代码换行出了问题
于是用vim 打开,
set ff=unix,然后把^M替换成\rxxxxxxxxxx^M在 windows的 vim 上没有生成成功,但是在 linux 下成功了就是按 ctrl-v然后回车,替换命令为:%s/^M/\r/g只是不知为什么
dos2unix工具为什么在这时候失灵
2018-01-24
[5:56] svn-server 安装配置,及使用方法
2018-01-27
[8:03]准备将日记改为以主题目的方式记录
[11:03]得到数据分析工具KST
xxxxxxxxxxwindows 64位版本,还是个绿色软件,下载包仅仅10M https://github.com/Kst-plot/kst-build/tree/Kst-32bit-3rdparty-plugins-Qt5 xxxxxxxxxx源码,有63M之多: git clone https://github.com/Kst-plot/kst.git cmake 编译时报错,提示依赖于 QT4,而且仅仅依赖QT4windwos Cygwin 下安装 QT
xxxxxxxxxx$ wget http://download.qt-project.org/official_releases/qt/4.8/4.8.5/qt-everywhere-opensource-src-4.8.5.tar.gz--2018-01-27 11:09:11-- http://download.qt-project.org/official_releases/qt/4.8/4.8.5/qt-everywhere-opensource-src-4.8.5.tar.gz正在解析主机 download.qt-project.org (download.qt-project.org)... 77.86.229.90正在连接 download.qt-project.org (download.qt-project.org)|77.86.229.90|:80... 已连接。已发出 HTTP 请求,正在等待回应... 302 Found位置:http://101.44.1.126/files/803100000325FEF2/mirrors.sohu.com/gentoo/distfiles/qt-everywhere-opensource-src-4.8.5.tar.gz [跟随至新的 URL]--2018-01-27 11:09:17-- http://101.44.1.126/files/803100000325FEF2/mirrors.sohu.com/gentoo/distfiles/qt-everywhere-opensource-src-4.8.5.tar.gz正在连接 101.44.1.126:80... 已连接。已发出 HTTP 请求,正在等待回应... 200 OK长度:241491467 (230M) [application/octet-stream]正在保存至: “qt-everywhere-opensource-src-4.8.5.tar.gz”qt-everywhere-opens 37%[======> ] 86.10M 5.80MB/s eta 24s# 得到QT源码,解压之,解压用了5分钟之久,解压之后的目录,竟然有709M之多 tar zxvf qt-everywhere-opensource-src-4.8.5.tar.gz # 设备环境变量# 解压完成之后,进入解压后的源码目录,执行以下命令:$ QTDIR=$(pwd) $ PATH=$QTDIR/bin:$PATH $ MANPATH=$QTDIR/man:$MANPATH $ LD_LIBRARY_PATH=$QTDIR/lib:$LD_LIBRARY_PATH # 设置好了待会编译需要的环境变量。#然后就是 ./configure,用了好长时间,Cygwin 上的 configure 失败。而 CentOS7还在继续#会问是编译商业版本还是开源版本,然后输入yes#然后编译,此过程较慢./gmake#然后是 make install,一定要求 root 权限
2018-01-30
[5:48]将串口抓包工具整理完毕
文档https://github.com/HateIron/HateIron/wiki/serial
[5:49]将之前做的secureCRT抓包工具做个整理
文档https://github.com/HateIron/HateIron/wiki/securtCRT
上月 下月